Quantcast
Channel: Ladybug's Teacher Files
Viewing all 179 articles
Browse latest View live

Making Beautiful Plans on Planbook.com (Part 2)

$
0
0
During the past school year, I started adding some more features to my planbook.com lesson planner. I wanted the text to stand out more, so I could quickly see what I needed for a lesson. You can read more about this in a previous post:

This worked out very well and I found my plans much easier to read. However, I started to wonder. Was there a way to make them even more clear? A way to use some of my favorite fonts to make the plans really pop?

It turns out, there was! You can use the html source code in planbook.com to make your lesson plans look exactly how you want. Here are a few images of how I am setting up my planbook for the coming school year:

Since I am able to use fonts from my computer, I can make a really clean layout and highlight each step of the lesson nicely. I used the following fonts to keep the layout simple, but a bit more eye-catching:

1. Century Gothic

KG Counting Stars is the font I used for the numbers and little icons and it makes a world of difference in the lesson plan layout! I'm using the heart icon for things that went well in a lesson, a minus icon for things that could be changed, and an asterisk for important events. (Did I tell you?? I am moving from 5th grade to 4th grade next year, so I really need a place to reflect on my lessons briefly).

To get this kind of look isn't very challenging for those comfortable with html, but it can be time-consuming and a bit intimidating if you are unaccustomed to it. So to help save you some time,  I created several templates to share with you, all ready to plug into the html source code on planbook.com.

But there are a couple of things to know first:

  • The plans will only display with your favorite fonts if they are installed on your computer. So if you opened the plans on an iPad or a different computer without the fonts, you would not see them displayed in the same format. 

  • The plans will not print out with these fonts (unless I am doing something totally wrong, which is quite likely...so please let us know if it works for you!)

So, if you are using your plan book on your own computer only, then this will work well for you!

Are you ready to begin? Here is what you will need to do, step-by-step:

ONE: If you do not have the beautiful fonts by Kimberly Geswein listed above, please click the links below to download them first (they are free for personal use):

TWO: Head over to planbook.com and set up your classes. I do not know my schedule until the next school year, so I just numbered mine and chose the colors I'd like them to be:

(I'm actually setting up my plans a bit differently this year. Instead of listing my entire schedule by times, I'm only setting up planning blocks for the classes I teach. I'm not listing lunch, recess, and specials this year, since I am the only one who uses my plan book and I have separate plans for subs).

THREE: Choose your favorite colors for your planner by clicking on the gear next to each subject, then Edit.

 Click on Class Color to select the shade you want:

I made a key of the brightest colors to share with you. I used shades 1 through 9 in my plans, but have included the code for 12 bright shades so you can choose what you like best for your lessons:

FOUR: Time to create your beautiful templates! As I mentioned above, I have already set up the html you will need to put in your plans. All you will need to do is choose the color you would like from the codes listed below, then paste them into your plans.

Head into the Templates section:

 Click the Add Template button:

Choose the class you would like to customize first from the drop down menu:

Click on the source code symbols (this is where you'll paste the html code):

You will see a Source Code box open. Leave this box open and blank for now:

Download the html code you need for this particular class. I am sharing the key again, as well as the code for 12 colors below:
1. Magenta
2. Pink
3. Orange
4. Gold
5. Yellow
6. Lime
7. Green
8. Turquoise
9. Light Blue
10. Navy
11. Purple
12. Plum

The links above will take you to the code you need. The code contains the fonts and colors, all set for you to use! Open the code, select it all, and copy it:

Then paste the code into the Source Code box on planbook.com and click Ok:

Now your template is all set! Just click Save:

Then do the same for your other classes. Once you are finished setting up these templates, you can head into your lesson plans and you will see them all ready to go:

Click inside the subject you'd like to start with, highlight the text, and type right over it. (Please Note: This works best when you highlight the words from right to left...it tends to keep the formatting in place this way):


You can delete anything you don't need or even copy and paste sections of this template to get it the exact way you would like for your plans. 

And that's that! You have your plans beautifully written:
I really hope this was of some help to you! Please let us know if you have any tips to add or how this works out for your lesson plans! (I was not asked to blog about this plan book service, I just love sharing new tech tips I learn with other teachers!).
  
Looking for more beautiful classroom management solutions? Please click below:
description here
Keeping Track of It All

description here
Getting Things in Order

http://www.ladybugsteacherfiles.com/2015/05/getting-labels-ready-before-next-school.html
Ready BEFORE Next Year


Organizing Shelves with Color (A BTS Giveaway)

$
0
0
Whether you are just starting to set up your room or already back in class, it is definitely back to school season. To celebrate this exciting time, I'm joining an inspiring group of teacher authors for a Back to School Giveaway! We are sharing a peek into our favorite parts of our classrooms, as well as chances to win some wonderful prizes to help you ease into a beautiful new school year. 

So my favorite part of the classroom is actually a pretty large one, but it is truly is the hub of our classroom—our shelving units.

Last summer I was on the quest for shelving I could use throughout the classroom. I knew I wanted materials to be available for my students to access with ease...and I wanted something that would tie the whole room together and give it a homey, craft room feeling (I'm telling you, I can spend literally hours browsing craft rooms on Pinterest!). 

So I bought five of these beautiful 8 cube organizers by Better Homes and Gardens (you can find them on Walmart here) because I knew they would be able to store just about everything my students and I use each day...and they do!

We use these organizers to house manipulatives, science supplies, our classroom library, dry erase boards, markers, community supplies, clipboards, textbooks...the list goes on and on!

In order to keep it all these materials as organized as possible, I sorted the five shelving units by color. 

So five bright shades are featured on the five different shelving units, color-coded according to subject:
pink: math
orange:reading
yellow: writing
green:science
blue: social studies

I tried to find supplies that matched our needs for each subject area. So we have pink and yellow staplers for our math and writing projects:

We have sets of clipboards in pink and orange for our math and reading work:

We also use color-coded paper trays for each subject area (this is a collection I've been expanding this summer, I will have to show you the new trays I bought soon!):

Why Organize By Color?
Organizing these shelves by color has helped my students keep our classroom neat with ease. When it's time to clean up, supplies get put back exactly where they belong because it's such a basic visual.

Organizing by color is also a beautiful and soothing way to decorate. I love using brights in our class, but I never want them to be jarring or distracting. With our materials organized by color, the effect is pleasing to the eye...calming, but still bright and fun.

Where to Find Colorful Storage and Supplies
Of course every teacher is always on the lookout for storage and supplies to match their ideal color scheme...and there are so many great places to find them. One of my absolute favorite places to shop for the coordinating paper trays, pencil cups, and staplers we use in class is at Poppin. The organizational materials are high-quality and you can shop by color, making the color-coding process so much easier.

I also like to prowl Target and Walmart for their Sterilite shoe bins. You can find some great lid colors to coordinate with your scheme, especially during this back to school season. 

Color-Coding on a Budget
It has taken me years to acquire coordinating storage containers because, well, it can get a bit pricey. If you are looking to color-coordinate but save some money as well, there are a few ways to achieve this look without spending lots of money on colorful storage containers.

Sort your supplies by color: Last year I began sorting all of our fun writing and coloring supplies by color. I even sorted our cleaning wipes by the color canister (as you can see in the orange picture above)! Not only does this look really eye-catching, but it makes it easy for students to find the exact materials they need:

Shop for inexpensive containers and dress them up with labels: The basic white-lidded Sterilite container is very inexpensive (less than a dollar) at Walmart and you can stock up guilt-free (well, relatively guilt-free!). Just attach a big, colorful label on the side and you have instant coordination:

Organize with mason jars: Mason jars are a beautiful way to showcase your color-coded supplies in without being too pricey.

To help you on your color-coding quest, I am giving away a $30 gift card to The Container Store where they have a huge array of the Poppin supplies we love to use in my class (plus tons of other colorful organizational goodies!). And there is more...the winner of the giveaway will get five other fantastic prizes as well! Please enter below...
a Rafflecopter giveaway


And please be sure to check out these incredible bloggers to learn more about their favorite parts of their classroom:


Callingallcolor-codingfans! What are you favorite things to color-code in class? Please share with us in the comments below...

Color Code and Organize Your Google Drive

$
0
0
Color Code and Organize Your Google Drive
It seems like I rely more and more on my Google Drive each year of my teaching. I upload my favorite resources to folders, create docs for my students to use in Google Classroom, store maps for Social Studies, upload photos of our Science experiments...there is just so much you can do with the drive. And I really love how easy it is to organize your files.

But, truth be told, I was never a big fan of the layout and colors. 

A sea of gray folders is never really helpful when you are a busy teacher trying to find docs on the fly. And, while you can colorize the folders, there is only so much control over the order they can be displayed.

Or is there?

It actually turns out you can number your folders to keep them in the order you would like them to appear (this is a little tip I learned from my sister over at Fashion Craze Learning Days). After doing a little research, I learned you can also include some fun numbers, to make those folders really stand out:

And it gets better.

You can even include some basic symbols to organize those folders even further:

Would you like to try? It's very easy to do...simply follow the steps below:

1. First you will need to open a tab for this fantastic site: Copy Paste Character. There is a drop down menu at the top. We'll be using the numbers first, so select Numerals from the list.

2. Open another tab to access your Google Drive. You can either make adjustments to the folders you already have, or start from scratch. If you are creating a new folder, right-click and choose New Folder and name it:

3. Your new folder will show as the default gray color. There are two ways to change the color. You can right-click for a popup menu, or double click the folder and choose from the drop down menu. Select Change Color:

4. Once you have chosen the colors for your folders, choose the order in which you would like them to be displayed. This is where the numbers will come into play. Since the default sorts are alphabetical (ascending and descending) or last modified or opened, the numbers give you a bit more control over your display.

Navigate to the Copy Paste Character site and choose the number style you would like (I went with the larger numbers in black):
Clicking on the number should automatically copy it to your clipboard. Head back to your Google folder. Right-click or use the drop down menu to choose Rename:


Go to the beginning of your folder name and paste the number:

Continue until you have numbered all of your folders. Please note: this will only work for numbers up to 9...once you choose 10 and above it will start to display out of order, 1, then 10, then 2, etc. I like to use subfolders, so I kept my major subjects to nine folders:

You can display these as thumbnails (shown above) or as a list:

5. Now to add subfolders and symbols! For my subfolders, I kept the same color as the subject and chose some basic icons to go with units/topics. We have three major writing units (Opinion, Narrative, and Informational) and I started setting up folders for other resources:


In my Math folder, I created subfolders for our Math Rotation materials, as well as numbered folders for our math units (I used the smaller black numbers for these units, so they would stand out from the large numbers used in the subject area folders):

To do this, click on a subject area folder you have created. Right-click or choose the red New button to set up a new folder. Follow the same steps as we did for the numbers, but this time choosing symbols to match your folders from the Copy Paste Character website:


And that's it! There is a nice selection of symbols from the website to choose from...though you may have to get creative with some of your folder symbols (I so desperately wanted a book symbol, but could not find one!). There is a chance other symbol sites may work as well, but many times the symbols do not show up in different browsers. I did a lot of testing and found these symbols to work best for my folders.

I hope this is of some help to those of you looking to color code and organize your Google Drive! Do you have any tips to share with us? We'd love to learn from you as well, please share ideas in the comments below...

Quick Tips for Back to School (A Quick Giveaway!)

$
0
0

Our students don't start back until September 6th this year, but I am definitely feeling the crunch to get things done. And I'm pretty sure everyone is feeling that same crunch right now, whether you are back in class or working hard to get your room set up for a new year. So I'm very excited to share this news with you...and it's going to be QUICK to save you some precious minutes this weekend! I am teaming up with some of my friends to share some quick tips for the new school year, as well as a chance to win a $25 gift card to TpT (just in time for the big, one day sitewide sale on Monday!).

So this school year I am trying to get a bit more organized with my paperwork...especially those papers going to and from the copy machine. This is actually an idea I adapted from my sister over at Fashion Craze Learning Days. I will be using a few accordion folders to store my original copies:
(I found these at Target, they are 6 pocket expanding files.)

I made tabs for the different types of work we do in a particular subject area:


As I print off the work for my class each week, I will slip the original into the corresponding tab and take the whole file (or files) with me to the copy machine:

I plan to put the copies back into the pockets so they stay organized by name (instead of putting my papers into those huge piles at the copier, facing different directions like I have in the past!) Then I'm going to place them into the corresponding file drawers that I use for our daily/weekly papers:
I have 18 drawers for my files (two stacks of 9 drawers) and color-code the subjects with these labels.

If you would like to try the photocopy labels in your class this year, please click the image below for this free resource:
http://bit.ly/PhotocopyLabels

If you would like some more options in this same color scheme for your class, please see this resource:
https://www.teacherspayteachers.com/Product/Editable-White-and-Bright-Labels-1870677

Are you ready to enter for a chance to win a $25 giftcard to TpT? There are 8 chances to win if you visit each of our blogs...thanks for reading!


Using Precise Colors in PowerPoint

$
0
0
I learned a new trick today that is going to be very helpful in designing printables in PowerPoint, so I wanted to share it with you!

Have you ever used the eyedropper or magnifying glass tool to get the perfect text color in your PowerPoint?

Whenever I select the shade I want with the magnifying glass, it is always slightly off in color:

But there is a solution to this!

If you can find the hex color code of the color you want, you can convert it to RGB in PowerPoint to get the exact shade you need.

Sound confusing? I promise it's not!

First use the hex code. If you know your hex code, you will go to the next step. If you don't use hex codes, you can use a color code website (I'll be sharing one further down) to choose your favorite shades.


Head to the site hex.colorrrs.com:
http://hex.colorrrs.com/

 Enter your hex code:
 And the RGB will pop right up.

Now head into your PowerPoint slide. Highlight the text and choose the color menu, then More Colors:


Next, choose RGB Sliders. This is where you will enter the values you found for Red, Green, and Blue:

This will give your text the precise shade you want! And, it will stay in your recent colors in case you need it again during your design session:
 

If you don't normally use hex codes but would like to work with more precise colors, there are many hex code websites out there (this one is HTML Color Picker):
http://www.w3schools.com/colors/colors_picker.asp


You can select the code of any color you would like to use in your design:

And convert it to RGB:

And that's it! I hope this was of some help if you have been looking to use more precise colors in your designs. 

Do you have any PowerPoint tips to share with us?

Using PowerPoint Tables for Math Printables

$
0
0
I love making printables for my students in math...but setting up number lines and fractions? Not so much. It can be SO time-consuming to line up all those little textboxes. Since a great deal of our school year involves number lines and fractions, I wanted to find a way to set them up more quickly. 

So I turned to tables! 


Why tables? They make everything lined up perfectly with minimal effort on your part! 

Here are the steps for each...

Create a Number Line with Tables
First, create an arrow line:

Then, insert a table with 12 columns and one row:


Change the color of the table to No Fill:
And click on Inside Borders to create the lines:

Drag the table over your arrow line:
If you'd like each of the vertical lines to be smaller, reduce the font size of the table:
The lines in the table should be evenly spaced out (unless they are accidentally shifted) and will save you time in designing all those separate little lines.

And there's more!

You can use a second table to create the numbers on your line. Copy the table you just made and paste it:
Right-click in one of the columns and delete it:

(I select the borders again, so I can see this table easily...this will help when you are lining up your numbers to the line).

Select the entire table to format the font type, size, and color. Be sure to center your text as well:

Type up your number line, hitting tab each time to jump to the next cell:

As in the previous table, the cells should already by evenly distributed...meaning you only have to drag the table into place, everything should be spaced out for you. Once you have the numbers where you would like them, deselect all borders:

Create Fractions with Tables
So if you like the number line tricks, you'll LOVE this next one!
Set up a new table with one column and two rows:


Make the table white (or choose No Fill). Then click in the first cell. Go to the borders and select the Bottom Border to make the fraction line:

Select the font type, color, and size of your choice (once again, be sure to center your text):
Adjust the width of your table so the fraction bar isn't too wide:
Copy and paste this little table to create other fractions:
And that's all! 

I hope these little tips will help save you a LOT of time! 
Do you have any table tips to share with us?

Creating Interactive Charts with Google Docs

$
0
0

Each year I've been working to go a bit more paperless in my classroom. Most recently, I've started building interactive charts for our word study (we use Jen Bengel's Interactive Spelling Curriculum and we LOVE it). Initially, I was keeping our words on large chart paper each week, but it was hard for all of my fourth graders to see the charts when they were building them in their spelling notebooks.

Luckily, it is very easy to make clean, eye-catching charts in Google Docs. These charts can then be projected for the whole class to see (we are fortunate to have a classroom TV for this purpose...more to come on this soon).

 Would you like to try? Please see the steps below...

 Create a new Google Doc and name it:

Go to File, and Page Setup:

Set all of your margins to zero (this will allow you to fill the whole page):
To create two charts, side by side, insert a table with three columns and two rows:

Adjust your table so the left and right-most columns are close in size...with a skinny column in the middle:
Select the middle column first (both rows):

Set the borders to white:

This will clear out the middle column, leaving you two tables to work with, side by side:

Now click in the top, left-most cell to change the background color: 

Click on a color of choice and it will fill this cell:

Select this entire first column:

Now change the border color to match the background you just chose:

You can also make it a thicker border (I used 1.5 pt):

Now you will have one table all ready to go:

Repeat these steps with a different color for your second table:

Now select the entire first row:

Choose the font type, size, and color you would like for your chart headings:
This next part is a neat little trick to help you fit many words into your chart! Click inside the first white cell (in the second row). Insert a new table:

This creates a table within your table:

Select this entire new table:

Change all the borders to white, so they will not be visible:

The table is there for you to type right in, but won't be seen in your chart:

This makes an effective use of space and lines the words up nicely for your students to see:

To do the same for your next chart, copy the entire cell:

And paste it into your second chart:
Now, when you are working on these interactive charts with your class, you can type a word, click tab, and jump easily from cell to cell!
Once you have these initial charts set up, you can copy and paste them into new docs and adjust the colors for different lessons/units. 

Thanks so much for reading...I hope this was of help if you are looking to go more digital with your charts!

Time-Saving Tips for PowerPoint Printables

$
0
0
PowerPoint is pretty easy to use once you get used to it. But, like any designing process, it can become quite time-consuming, can't it?

So I'd like to share four fast tips to help speed up things up a bit...

Tip One: Replace Images
Inserting clipart can take some time as you navigate to the folder, select the images you need, drag to the right location, and so on. Luckily, the "replace picture" feature in PowerPoint makes this go a bit more quickly. This will work well when you are designing with clipart that is the same size.
For example, you want to include several different flavors of ice cream in your resource. To save time, you can copy the first cone and ice cream scoop and paste it. Then, instead of inserting a whole new image for a different flavor, select the flavor you want to change:
Then head to the "replace picture" feature found in your toolbox or toolbar:

Now you can quickly navigate to a different flavor and it will place it in the same exact spot, saving you lots of time!

Tip Two: Replace Fonts
Just as you can replace images, you can also replace fonts. This is really helpful if you change your mind and want to use a different font in your file. It is also useful if you are designing a file with multiple font options.

Back to that ice cream. You start out with a clean, simple font:

But you decide it doesn't look bold enough. For a quick change to the entire file, you can go to Format and then Replace Fonts:

This will make the following menu pop up:

Making sure you have your current font selected under "Replace", choose any font you would like under "With":

Now all of the old font will be instantly replaced! Please note that you may have to adjust the size and positioning after, as different fonts vary.
Tip Three: Create Templates
This is a HUGE timesaver I blogged awhile back. How would you like to start a new PowerPoint file all ready to go, with the fonts you always use? Follow these steps and save tons of time in reformatting each new printable you create…
Start a new file and delete those standard text boxes:

Set up a new text box:

Change it to a font you always use, right-click the text box , and select "Set as Default Text Box":

Once you have all of your standard fonts in the file, go to File and Save As:

Finally, save the file as as a template (with a .pot extension):

This will be the template you open each time, so you have it ready to go just as you like. Be sure to save it under a different name, however, so you don't write over your original template!
Tip Four: Duplicate Slides
This is another great way to save lots of time if you are creating printables with the same layout. After you have set up an initial slide, go to the thumbnail menu on the side (back to those ice cream cones!). Right click on the thumbnail and select "Duplicate Slide" (or Command + D if you are using a Mac):

This automatically copies the whole slide for you:

Now you can simply swap out the text:

As well as the images, just as we did in the first tip:
And that's it...four simple tips that can really save you time when you design! Thanks so much for reading.

Designing Beautiful Google Docs

$
0
0
Designing Beautiful Google Docs
So I know I've blogged many times about how much I love designing printables in PowerPoint. 

And I really do. 

But this year I've been learning more about creating documents in Google Docs. There are so many reasons to create in Google Docs... 

  • You can share documents with your students and colleagues.
  • Everything is instantly saved as you create. 
  • You can keep all of your classroom documents organized in your Google drive.

But let's be honest. Sometimes Google Docs can look a little...well, blah, for lack of a better word. Especially if you are used to creating documents with your favorite colors and fonts. In comparison, Google Docs can be a bit drab:
(boring, right?)

But it turns out there are actually a few ways to really dress up your Google Docs and make them a bit more eye-catching:
Would you like to try? Here are some tips and shortcuts to get you on your way...

Finding Your Favorite Fonts
Ok, the bad news is you cannot upload custom fonts to Google...which can be hard when you are so used to designing with your favorite fonts.

The good news? There are hundreds and hundreds of Google fonts to choose from...so it's just a matter of finding a few of your favorites.

And it gets better.

There is a Google Fonts site that makes it a snap to browse the 809 (!!!) possible fonts you can add to your drive!
https://fonts.google.com/

(please click the image above for the link)


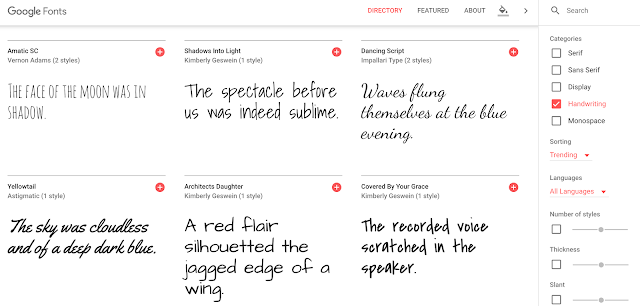
There are many convenient ways to navigate this site if you use the menu on the right. You can search by category, such as handwriting fonts:


You can also refine your search by slant, width, etc:


AND...you can even type anything right under the font to test it out:


Once you have an idea of the fonts you would like to use in Google Docs, you can add them in very easily. Keep the Google Fonts site open, so you can refer to the font name:

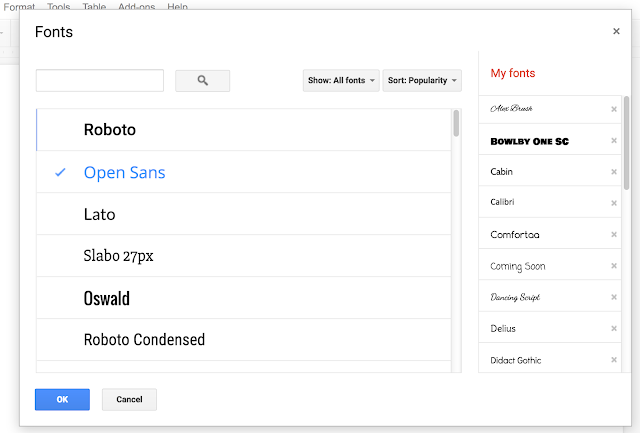
Then head to your drive, create a new document, and choose the font drop-down menu. Select "More Fonts" at the end of the menu:


 This will take you to a pop up screen where you can search for your font:


Click on your font once it appears and then click OK:

Now your new font will be part of your font list:

If you'd like to remove a font from your list, you can follow the same process. Head into the font drop-down menu, choose "More Fonts", and you will see your font list in the right-hand menu. Click on the x next to any font you no longer want, then OK:

This will remove the font from your list. 

I still have some more exploring to do, but here is a list of my current favorites for Google Fonts:
I like to keep my font list pretty simple...it's always nice to have a go-to sanserif font (I LOVE Didact Gothic for this purpose) along with a few fun script and bold fonts.

Once you have all of your favorites selected, you can even set up a template doc....then you can just copy and paste the fonts into all new docs you make: 


Customizing Your Colors
So there's a lot more freedom when it comes to color choice in Google Docs....you can actually use any color you'd like, as long as you have the html code of that shade. 

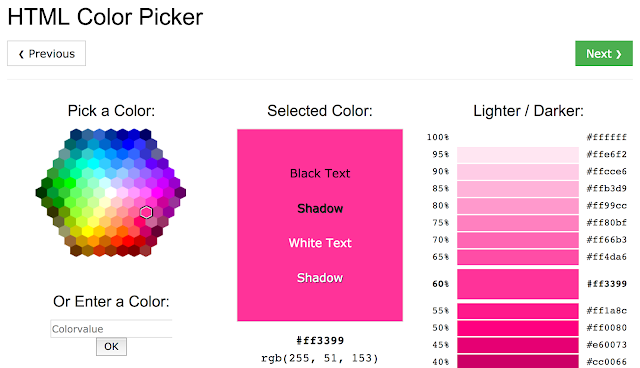
Not sure about the html part? There are many websites with every shade of the rainbow, along with their digital value. Here is a great color picker site by w3schools.com:
http://www.w3schools.com/colors/colors_picker.asp


Once you find a shade you like, highlight the html code (the six digits with the #) and copy it:

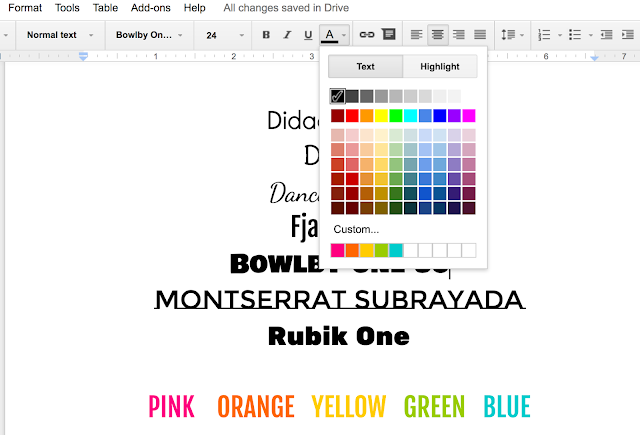
Then, in Google Docs, choose the text color drop-down menu and click "Custom":
Now you can enter the html color code to get the exact shade you prefer:
 And you can now type in this color:


As you keep adding custom colors, they will remain in the custom menu in this document:


The custom colors won't show up in any of your new docs automatically. However, there is a workaround to this...you can save this document (or even paste these codes into your favorite fonts document). The moment you paste these custom colors into your doc, they will show up again in your Custom menu:

Customizing Your Margins
Now that you have more control over your fonts and colors, you can start to change the layout of the doc itself.
Google docs tend to have large margins in the header and footer. If you'd like to make better use of space and decrease these margins go to File, then Page Setup:

Each margin is set at 1 inch and can be changed. I usually change all to zero, but you can just change the top and bottom if you'd like to only control those extra spaces:

This will bring your font to the top of the page:


 And allow you to create the amount of space you would like at the top of the document:

Using Tables for Pops of Color
One of the downfalls of Google Docs is you aren't able to import fun borders for your printables (though you can in Google Slides, more to come on that in the next blog post!). You can use tables, however, and customize those with your favorite colors. You can use one large table cell as the border of the whole doc, or a series of cells for multiple boxes.

In the student password doc I created, I set up a table with one column and nine rows:

If you set your side margins to zero, the table will appear very wide...but can be adjusted by dragging one of the sides to make it more narrow:

To give the illusion of a series of boxes, every other row will need its border deleted. This will make the nice white space between each box. To do so, click inside the second cell, choose the border, and set it to zero pt:

The same can be done to every other cell, leaving a table that looks like this:

Now click inside the first cell and choose your custom color for the border or fill:

You can change the border's width as well:

And then can do the same for each row:

To make the space between your boxes smaller, simply click in the cells and choose a small font size:
 

Now you can type in each cell with your custom fonts and colors!

To save time, you can select the font combos you chose and just paste them in the next cell:

Then you can alter the colors and phrasing in each:

Printing Your Docs
Once you are finished creating, you can click the printer icon right under the File menu. This will generate a PDFof your work:

Please Note: Your docs will print best if you are working in Google Chrome...if you use a different browser, some of the fonts may not appear correctly in the PDF.

I hope these tips will help you with your future designs! I know I will be creating more docs in Google for my class, now that I know how to customize the look. 

Next blog post will be all about designing in Google Slides...stay tuned for more :)

Finding Time for the Holidays (as a Busy Teacher)

$
0
0
Finding Time for the Holidays (as a Busy Teacher)
It's the most wonderful time of the year!
Or is it? 

For many of us, this can be the most hectic time of all with report cards, student projects, holiday assemblies, mountains of grading...it seems there is more to do than ever come each December! And just at the time you are ready to enjoy the season with your friends and family.

While there is no simple way to get through all of the chaos, there are a few small things I have done over the years to help ease my holiday schedule...and I truly hope these ideas and resources will be of some help to you during this season as well!

 Work-Free Weekends
This is something I have been working on for a couple of years now. And not just for the holiday season (though it will be a HUGE help with the stress level in the coming weeks). 

One of the hardest parts of teaching is the fact that our job is never truly done. It's very rare to feel "caught up" or ahead of the game (unless I am alone in this feeling!). Keeping this in mind, it has become increasingly important to take the time to relax when needed. 

For this reason, I have a schedule for each school night. On Monday through Thursday, I  plan ahead for the following week. Bit by bit, I map out our lessons and units. By Friday night, I am free to put away any work for the weekend (aside from any fun little project I might want to work on). 

I save my grading for school, planning for home. I set up a little schedule of what will be planned each night...

I plan the easier lessons/activities for early in the week (especially on those tiring Monday nights!) and keep the more intensive subjects separate (such as Math, then Reading and Writing). 

After dinner, I work on my lesson plans and get as much done as I possibly can. Some nights, this can be very hard...but the reward is a weekend free to relax and recharge. And this has truly made a difference in my teaching. I find I am able to come back ready for a new week of work. I also feel less like I am working around the clock, it's just those four nights of big planning.
I have a copy planning sheet above in Google Docs, in case you would like to use/modify it for your lesson planning:
https://docs.google.com/document/d/1gmORT0uszO9tfb665Yq5Y_6oZaqw6RZCYbsLyVnrwkw/copy
 (please click the image above for the link)

Tackling Report Cards
If you are on a trimester schedule, you may have report cards due during the holiday season like we do. It's such a hard time to have extra work, but I have found if I balance it out (much like my lesson planning schedule) I can get them done bit by bit. 

To do this, I break down the grading process over the course of two weeks. I tackle a particular subject each day. The same goes for those comments too (the most time-consuming part of all!). I will usually write about 4-5 comments a night (or during my planning period). 

Even though we enter our grades online, I like to keep a Google doc for student comments:

This allows me to see the comments for each of my students, at a glance on one sheet. Then I can just copy and paste the comments into our grading system. 

If you would like to use this template, please click the image below to make a copy for your drive:
https://docs.google.com/document/d/1rWSpvnvVgjK8y1BvprFrL3JWrEoAsBWOV4KptIACsow/copy

Making a List (or LOTS of lists!)
Santa isn't the only one who needs to make a list (and check it twice!). I find the more lists I make to keep track of everything, the better I am able to get it all done. If I know exactly what has been done, I waste far less time in searching for things and tracking down student work. I have a post all about this (Keeping Track of Everything With Checklists) and I will say this greatly reduces my stress during the holiday season, especially with all those projects and final pieces due:

I store all of my checklists in a book and I cannot tell you enough how much this keeps me on track, especially at this time of year! Please click the image below if you'd like to see more about this resource:
https://www.teacherspayteachers.com/Product/Instant-Checklists-1986258


I also have a set of holiday checklists, made just for this time of year. You can download them for free by clicking the image below:
https://www.teacherspayteachers.com/Product/Instant-Checklists-Holiday-Sampler-2181752

Thank you so much for reading! I hope you may be able to use some of these ideas to help you find some time to enjoy the holiday season!

A Google Drive Interactive Seating Chart

$
0
0
A Google Drive Interactive Seating Chart

Ah, seating charts...such a joy to formulate each time.
Or not.

If you are anything like me, you hastily sketch out a new plan at the absolute moment of necessity (those seats MUST be changed now!!) on a random piece of scrap paper lying nearby. And forget at least two names. Then recount how many are on the plan. And proceed to scratch out and move names again and again. Then perhaps lose said plan once or twice before rearranging the seating...


I'm not alone in this, am I??

Honestly, seating charts are just one in a hundred thousand tasks teachers must maintain and they can quickly become another stressful burden. So this year, I decided to take control of my chart chaos...and thought the best way to do so would be to go interactive with Google slides (thankfully, nothing gets lost in my Google Drive). Plus, it turns out it's very easy to make an eye-catching plan!

To help you on your way, I made a basic template to save in your Google Drive. Please click the image below to add it to your Drive and modify:
https://docs.google.com/presentation/d/1Q7Rc7LhJndffwYjkAWA7DfosqG2QZkICKGdscYYROVo/copy


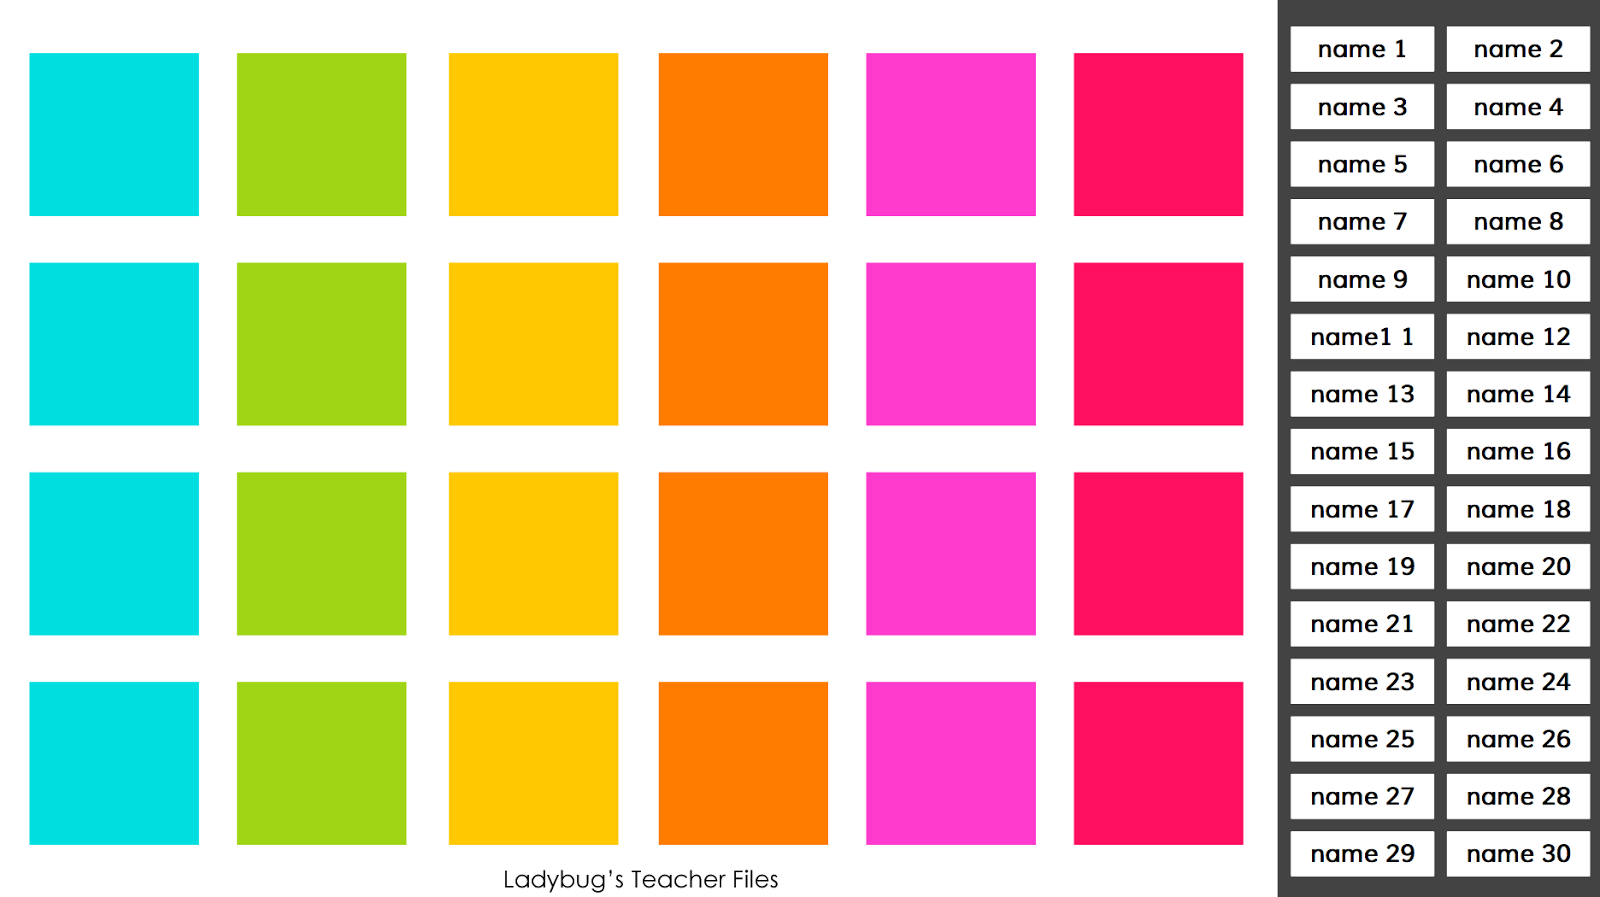
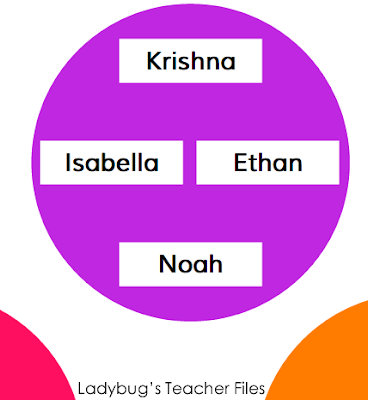
This template has two sections...one chart with circles that can be used as tables, as well as another with squares to be used as desks:
Since we all have such different seating arrangements, the following steps will show you how to use this template to best work for your classroom...

If you would like to use one of the templates in the file, go to the sidebar and click on the one you do NOT want to use and then delete:

Now you can modify the slide you would like to work with. If you are using the desk template, you can click and drag the squares into the formation you use in your class:
You can also create additional squares by copying and pasting the current squares in the document. Need more space? You can click on all of the squares and change their size. Everything can be modified in this slide until you have the idea layout.

Do you need a totally different configuration than the ones provided? Go into one of the slides (such as the circle tables), select all of the circles, and then delete:
You now have a blank canvas to work with. 

To select your own shapes for seating, go to the Shape drown down menu and select one:
 
Keeping the shape selected, remove the gray border by clicking on the Line Color drop down menu and choosing Transparent:

Then, change the color of the shape by clicking on the Fill Color drop down menu. This template includes some nice, bright custom colors for you to choose from (or you can choose your own favorite shades):
Now you have your first seating piece to work with!

There are many shapes to work with in Google Slides, so you can really recreate your seating setup. I don't focus *too* much on the perfect layout of my classroom. Instead, I try to set up a shape for each of my seating types so that I can easily place my students each time we switch seats. 

This is an example of my sister's Kindergarten class setup...we focused more on recreating her table shapes rather than making a perfect map of the classroom, it's really just about knowing who is sitting where:
Using different shapes will also be very helpful for those of you who are working with flexible seating:

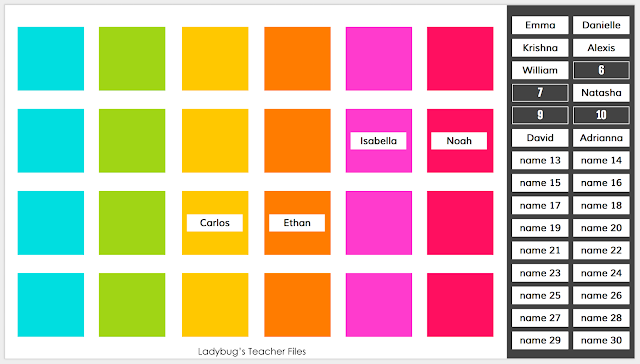
Once you have created the layout that best represents your classroom, it is time to add the names. I created a name menu on the right-hand side of the screen with textboxes for each student. To add your student names, click in each text box three times to highlight the text:

Then type your students' names right over the text:


You can delete any textboxes you don't need (or create additional ones of your own for larger classes).

Now here comes the fun part!

To start arranging your chart, simply click on each student's name and drag the textbox to the seating of your choice:

You will notice a number spot for your student as you drag their name to a seat. This makes it easy to return the name textboxes back to the menu if need be. 

If you don't like to use numbers for your students, you can easily modifying these black textboxes by clicking twice inside and typing your students' names instead:

The textboxes can be arranged in any formation as well:

They can even be rotated:

Once you have your current seating chart created, you can duplicate it so it can be changed in the future. In the sidebar, click on your current slide and then Command + D (or go to Edit, then choose Duplicate):

Please Note: If you keep the same room arrangement for the whole school year, it will be best to duplicate your slides BEFORE placing your students at seats...that way you have a year's worth of slides ready with your students' names in the right-hand menu, all ready to arrange.

Need to print your plans for your substitute plans? There's a way to print them without the black sidebar. Click on the print icon:

Open the file with Adobe Reader (it's a free download):

Go to Edit and then Take a Snapshot:

Select the area you would like to print:
Now you will have a nice paper copy of your plans, without wasting ink on the sidebar.

How do you like to keep your seating charts? Is this something you would try?

Thanks so much for reading!

Looking for more eye-catching, organizational resources? 
 photo Checklists Cover.png 

 photo attendance board cover.png

 photo math rotations board cover.png

Seating Meets Storage with Otto Storage Stools

$
0
0
This year I was very fortunate to be asked to review a set of storage stools by GitaDini. As soon as I learned they were combination seating and storage, I knew I had to try them out! I was sent a set from GitaDini and quickly fell in love...so much so that I even bought some additional ones from Target!

I wanted to share how these stools have worked out in our class so far, as well as an opportunity for you to win a pair for your classroom!

The stools do require some assembly when you first get them...but the process is pretty quick and GitaDini has a video to help you on your way. Once the stools are assembled, you can simply take the off to store any materials you would like:

One of the things I love the most about these stools are their dimensions. They are the perfect size for upper-elementary students (and for adults as well!). There is ample space on the top for students to sit comfortably and the height is perfect for my fourth graders.

The inside of the stools has enough space for my students to store their backpacks, jackets, and lunch bags:


This really is ideal for our classroom, as we do not have any cubbies or hooks for our backpacks and jackets. It's amazing how tidy the room becomes once all these items are tucked inside...I wish I had a class set of these stools so all of my students could stow their materials!
 

The plastic surface is very easy to keep clean with a damp cloth or cleaning wipe (especially now that we are tracking in New England salt from the icy roads!):

These stools would be a great option for those of you who use flexible seating. I do not use flexible seating in my class, but do I let my students choose whether they are more comfortable working in a stool or chair. The Otto storage stools fit in so nicely in with the other furniture options at our tables:

My students also love to use the stools as a tabletop surface when working on the floor or our couch:

There are 12 different colors and two surface options to choose from. I went with the ovals because I love the design (and I can see the contents inside!). There is also a smooth surface, where you cannot see the contents:
As for durability, the Otto storage stools have held up well...both students and adults have used them in my class and the stools have supported them nicely. I have found some small chips of plastic missing near the ovals, but I think this is due to my students hooking their feet into the holes while working. In the future, I would love to try the smooth surface as I believe it will hold up better to daily use since do use them for seating all day, every day. I also believe if these were used for small group instruction or in a reading area, there would be less chipping near the ovals, as the students wouldn't be using them all day. 

I really can't tell you enough how much I do love these stools! They have such a beautiful design and can store so many things in an elementary classroom...they really are incredible space savers! And my fourth graders adore them as well, which is the most important part (they literally spent the first two weeks of school showing them off to anyone who visited our class!).

Would you like to try these out in your classroom?  GitaDini is kindly offering a pair of Otto Storage Stools to one lucky winner! Please see the Rafflecopter below to enter for your chance to win...

A Google Drive To-Do List

$
0
0

Happy New Year everyone!!! In the spirit of organization, I am sharing a little interactive tool I hope you will be able to use for your planning. 

We are heading back to school on Tuesday and I wanted to be sure I had everything prepped to get back into the swing of things...and in a digital format I could store in my Google Drive. 

So this to-do list is available as a Google slide and features a table you can type right into:

 You can create a bulleted list of items (and delete as they are completed to use the list again):

The headings for each list can also be altered if need be...just highlight and type right over each:


And that's it! A simple, but hopefully helpful tool! I will be using mine as I get myself organized later today...

Please click here if you'd like to make a copy of this list for your Google drive.

Do you like keeping lots of lists? This is my go-to resource to keep track of EVERYTHING in my classroom...and it only takes an instant to set up:
 photo Checklists Cover.png

Thanks for reading and Happy New Year!

Thanksgiving Morphology Resources to Share

$
0
0
thanksgiving
Happy-almost-Thanksgiving everyone!! We are in school for a few more days and I've been working on a couple of resources to keep my class following the usual routine, while celebrating the upcoming holiday a bit.

And I'd love to share these new resources...as a small token of my thanks and appreciation for you!

First up, I have some special spelling lists planned for the week. These spelling lists focus on four to six different affixes and roots that all have a Thanksgiving tie-in. These differentiated, editable lists can be found in my store...just click on the image below to download:

I also made a little graphic organizer to help students examine one of these Thanksgiving-themed words in depth:
thanksgiving

There are places to fill out the usual components...the word, definition, part of speech, a sentence:
thanksgiving

There is also a part for students to tie the morphology to the meaning of the word:
thanksgiving

As well as a place to create an illustration and make a holiday connection:
thanksgiving
(Perhaps I should have warned you first, I am not the best artist!! 
My 5th graders are always kind to me about it though!)

If you would like to grab this graphic organizer, please click on the image below:
https://drive.google.com/file/d/0B2ARzMSbNzXNZEtoQlhXM2pPV00/view?usp=sharing

I hope some of you might be able to use these resources!
Unless you are already on your break...which leads me to my big question:

Are you in school this week? Or has your Thanksgiving break already begun?

Save Yourself Some Merry Little Minutes...

$
0
0
The holiday season is here and I can hardly contain the thoughts of baking cookies, shopping, wrapping gifts, and spending quality time with my loved ones.
But wait, I’m a teacher.

I don’t have any time for these things.

I have a trillion things to do!! Trimester assessments, projects, grading papers, publishing writing pieces, report cards...the list goes on and on and I can see my holiday festivity time fading fast.

Or maybe not.

Because several of my upper-elementary friends and I are hoping you will join us in sharing a list of ways we can save ourselves some merry little minutes...and free up some time to enjoy the season!

Here is one tip that has helped me so much already this month:


I know that sounds kind of obvious (or perhaps you are thinking I’m a major procrastinator).

But it works.

Take, for instance, report card comments. They’re extremely important, yet extremely time-consuming. 

And our first trimester report cards ALWAYS fall within the middle of the holiday season (mid-December, to be exact!). Every year I find myself spending hours and hours of precious holiday time typing away on comments for two days straight.


So, last year, I decided to break it down:

I write two report card comments every day, starting as soon as I can.  Two is such a modest, UNoverwhelming number, isn’t it?

Here is why I love the two comments method:

It's Quick

I can spend just a bit of time on them each evening and then put them away for the night.
 
It Adds Up Fast
Though two comments may seem slow, they add up really quickly. Within one school week, I already have 10 comments done!

It's Not Overwhelming
Instead of being faced with the overwhelming task of writing all of the comments in a weekend (and my subsequent avoidance tactics, such as laundry, vacuuming, and other pressing things!) the two comments is oh-so-easy to achieve in one sitting.
  
It Helps Me Maintain Focus
I know which two students I will be commenting about next. Which gives me all of that driving-to-work, drying-my-hair time to think about my meaningful comments, on just the two students. In all seriousness, this is very important to me. I want to make sure I have given ample time and reflection for each child.


So it sounds simple but it has worked like a charm for me...and I hope it may be of some help to you!


And here's something exciting! Many of my upper-elementary friends are also sharing their time-saving tips on their blogs:
Do you have any tips to share in regards to report card comments? 
Or other times savers? I would love to learn from you!

Creating Default Templates in Powerpoint

$
0
0
Creating Default Templates in PowerPoint
 Oh Powerpoint, how do I love thee?

Well, if we're being honest, in many ways...but there are a few I could really do without.

Like those two textboxes that come up every time I make a new printable:

And this default font I NEVER use:

Oh and those horribly-colored tables...
what is with all the different font colors in one table anyhow??
But, like any faithful teacher-creator, I remain loyal to my true love.

And patiently delete textboxes. 
And reformat tables. 
Again and again.

But I couldn't help dreaming...

And it is! Because I have FINALLY learned how to create my own default templates!!!

Would you like to try it out? Just follow the steps below...

  1. Start a new presentation. Select those two textboxes and delete them:

  2. Create a new text box and type anything:

  3. Choose your favorite go-to font (mine's Century Gothic). Then right-click on the text box and choose Set as Default Text Box:

  4. Delete the textbox so you have a blank slide:
     
    You could save the template now and you'd have the font/fonts you'd like all set to go. But if you like to use tables as well, see the next steps:


  5. Insert a table...I just choose a couple of rows and columns to format, you can always add more in the future and your formatting will already be done for you:

  6. Select the table:

  7. Reformat the colors in the way you would like them to appear in the printable:

  8. Select the table and choose the font, font size, and text orientation you want:

  9. Keep the table selected and click on the bold button twice (otherwise parts of your text may show up in bold because of the default formatting):


  10. Type in each cell, to be sure the font appears the way you would like:

  11. Then delete all the cells. I just placed my table near the bottom of the template. I use tables a ton, but if I don't need it, I will just delete it:

  12. Now to save your new default template. Go to Save As:

  13. Name your template and save it as a .pot file:

  14. Now you can open this template and it will be all set with your fonts and layout:

  15. Once you are finished designing in this template, choose Save As (so  you can rename it and preserve the original template):
And that's it!

I seriously could not be more excited about this! And the possibilities are really endless...you can set up a series of templates for all of the printables you make.

I really hope this was of some help to you! If you'd like to learn more about designing printables with Powerpoint, please see this previous tutorial:

    2018 Winter Olympic Websites for Students

    $
    0
    0

    I've been planning a lot of learning fun all centered around the Winter Olympics for the next two weeks. Actually, in all honesty, we are really just working on the same lessons and activities I would normally be teaching this time of year...just with an Olympic twist!

    I promise to share everything we do on the blog in the coming days and weeks!

    One of the major activities we will be working on is writing nonfiction text structure magazines. This is a fantastic project created by Mary from Teaching With a Mountain View. It's always a class favorite and I've been waiting anxiously for four years to do this with a Winter Olympic's theme again (I did this back during the Sochi Winter Olympics and my fifth graders LOVED it).

    So, my fourth graders will be working as journalists over these next two weeks (more to come on this soon) and researching and writing a magazine about the Winter Olympics. We will be using a variety of sources for our research...from reading passages, to videos, to articles online.

    As for those articles online? It was actually a bit tough to find ones that were kid-friendly...it took me some time to find a good list of sites! So I wanted to share the list I came up with after a great deal of searching...in hopes to save you some time if you want to do this with your class.

    I have a wide range of reading abilities in my classroom (as I'm sure many of you do!) so I wanted a mix of visual, easy-to-read websites, as well as more challenging ones for my high-ability readers.

    There are four main sites we will be using for our Internet research (there's also a list of all links sorted by sport at the end of this post):

    DK FIND OUT
    This site is not centered on the Winter Olympics, but features some wonderful visuals that will be helpful for newcomer English Language Learners or lower-ability readers. There is information on skiing, snowboarding, and ice hockey available here.

    CBC KIDS OLYMPICS
    This is another easy-to-read, visual website that serves as a great introduction to each winter sport. There are videos as well, but they don't seem to be working at this time (disappointed!!) but I have other videos I will share with you in a later post.

    PYEONGCHANG 2018
    The official PyeoChang website has more difficult text than the previous sites and is a great challenge for higher-ability readers. There is a ton of information on each winter sport. If you click on "overview", you will also find some awesome infographics and bulleted lists of important information:


    KIDDLE
    Kiddle features information on all winter sports (except for nordic combined). There are many great photographs and descriptions of each sport. 

    To save time in searching through these sites, I gave our classroom website a bit of a makeover. Each page features links to a specific winter sport, all organized and ready for my students to read:


    I have a list of all the the links we be using sorted by each sport below...just in case you would like to try the same in your class:

    ALPINE SKIING
    https://www.dkfindout.com/us/sports/skiing/
    http://www.cbc.ca/cbckidsolympics/sports/alpine-skiing
    https://kids.kiddle.co/Alpine_skiing

    BOBSLEIGH
    https://www.dkfindout.com/us/sports/ice-hockey/
    http://www.cbc.ca/cbckidsolympics/sports/ice-hockey
    https://kids.kiddle.co/Ice_hockey

    LUGE
    http://www.cbc.ca/cbckidsolympics/sports/luge
    https://kids.kiddle.co/Luge

    NORDIC COMBINED
    http://www.cbc.ca/cbckidsolympics/sports/nordic-combined

    SHORT TRACK
    http://www.cbc.ca/cbckidsolympics/sports/short-track-speed-skating
    https://kids.kiddle.co/Short_track_speed_skating

    SKELETON
    http://www.cbc.ca/cbckidsolympics/sports/skeleton
    https://kids.kiddle.co/Skeleton_(sport)

    SKI JUMPING
    http://www.cbc.ca/cbckidsolympics/sports/ski-jumping
    https://kids.kiddle.co/Ski_jumping

    SNOWBOARDING
    https://www.dkfindout.com/us/sports/snowboarding/
    http://www.cbc.ca/cbckidsolympics/sports/snowboarding
    https://kids.kiddle.co/Snowboarding

    SPEED SKATING
    http://www.cbc.ca/cbckidsolympics/sports/speed-skating
    https://kids.kiddle.co/Speed_skating


    Thanks so much for reading! I hope these links will save you some time in your Olympics learning!

    Using Labels to Keep a Clean Inbox

    $
    0
    0
    using labels to keep a clean inbox

    As I wrap up my sixteenth year of teaching, I have been reflecting on all the things I do to lower my stress level. Because teaching can be very stressful, as you well know.

    One of my biggest stressors is feeling overwhelmed by the sheer amount of things to manage: tons of paperwork, stacks of materials to organize, hundreds of papers to grade...and an constantly over-flowing email inbox. 

    Here's my biggest problem with school email: there are so many things that cannot be addressed immediately. 

    I click through my mail, I read, and I think...
    "I'll tackle that one later."
    OR, "I can't even THINK about this right now!". 
    OR, "I can't delete this until next trimester when we go on that trip."

    And this list goes on and on.

    Next thing I know, my inbox has 8,452 emails! 
    (I didn't check, but I'm fairly certain that's an accurate number. Or even higher.)

    I've tried to tackle this problem before, using a few tips that helped me keep on top of my mail. I shared those in this older post: Inbox Overflowing? Quick Tips to Put Your Mind at Ease. And those strategies definitely helped me keep on top of my mail. But there was still all those emails that couldn't be addressed immediately.

    So this year I turned to labels.

    I am very fortunate my school uses gmail for our work email. Gmail has a very easy way to setup and color-code labels for your inbox. I'd like to share the steps with you here, even if you don't use gmail at your school...hopefully you can use a labeling system as well!

    To create my labels, I first thought of some categories that would cover all of the emails I tend to keep. IEPs and Parents came to mind first, as those are emails I haver to save for the entire school year. I decided to make labels for ELA and Math, as we tend to get assessment information and workshop emails I like to keep for those subject areas. Events is a good label for field trips, fundraisers, and assemblies. Students is a newer label I just created, as a place to store any Google docs my students share with me (in case I don't have a chance to add them to my Drive at a particular time):


    To create these labels, you will need to click under the More arrow, on the left-hand side of your inbox. Add the bottom of this sidebar, you will see Create new label:


    Once you click on the new label, you will find a pop-up screen where you can enter the label name. I write mine in all caps for a clean look that stands out in my inbox:
    (I don't nest my labels since I only use six categories...nesting would be very helpful for any subcategories you want to create however).

    You can see the new label I created for Report Cards (not actually a label I use, just an example here):


    The label won't be assigned a color unless you choose to add one. To do so, click on the right side of your new label and you will see an arrow and a menu appear. Choose Label Color:


    You will see pre-selected label colors, as well as a place to add a custom color. I try to select some bright shades with a white font:

    The custom colors have a bit more variety, but you can't choose any html color you would like:


    For the example, I chose a bright purple with a white text color: 


    Once you have set up all of your labels, you are ready to get organized! As new emails come in, you can read them and discard...


    Or you can click and drag an email you need to save to the label where you would like to store it:

    When you click on a label in your sidebar, you will find all the emails you've saved under that label. If you open a particular email, you will see your color-coded label at the top:

    If you'd like to remove a label, click on the right-hand side of the label and select Remove label:

    And that's it! Once you have all the labels you need, it will be easier to delete and store ALL of your email...so your inbox will become a calming sight for your teacher eyes:


    Color-coded, digital organization in Google is always a huge stress-relief for me. I keep my grade book online and sort all subjects by color (it automatically averages too, which is a HUGE timesaver):

    I also color-code my subjects and display all of the important information for my students each day, from materials needed to the steps to take during a class. Not only does it help me know exactly what I am doing in a given lesson, but it also keeps my students on the same page (and there are no more questions about what they need or what we are doing next!):


    Do you like to organize your teaching digitally? Please share your tips with us!

    Giving Students a Voice in Our Classroom Library

    $
    0
    0
    There's nothing so beautiful as seeing your students happily reading, am I right? I've been working really hard to convert some of my previous not-big-fans-of-reading into voracious readers this year and I am starting to see them really take off now!

    One of my favorite tools to help with this has been our Book Request Form...and I wanted to share it with all of you.

    The book request process is very simple. 

    I leave the form in the classroom library where my students can request new books they've been anxious to read...or the next book in a series (can you tell we read The Lemonade War together this year?).

    I order all the books I am able to with our Scholastic bonus points. And some I order on Amazon Prime (if they are at a reasonable price and my students are dying to get their hands on a particular title because, well, two day shipping!). Then I pencil in the date the books are expected to arrive (to avoid the endless, "are the books here yet??" questions each day). 

    There are two things I love about this process.

    First, it gives keeps my hungry readers well-fed...I don't want any lapse between books and this helps nicely if we don't currently have something a student is looking for in our library. Or if they are really taken with a new genre or author. 

    Second, (and most importantly) I love that it gives my students a voice in our classroom library. They choose the books they want to enhance OUR library. And their opinions matter. Seeing a classmate ask for and enjoy a new book instantly engages the other readers and they want to try that book as well.

    Would you like to use the Book Request Form in your class? 

    Please click the image below to download a copy:


    Viewing all 179 articles
    Browse latest View live